A Node.js version of MySQL Service Broker for Cloud Foundry
Overview
This is a Node.js version of MySQL Service Broker for Cloud Foundry which can be deployed as a Node.js application to Cloud Foundry or anywhere the node.js framework works.
The specification complies with the Service Broker API v2. Some other official documents of Cloud Foundry - Managing Service Brokers & Access Control - were also be referenced.
Appreciate the original Java example which can be found here.
Why creating an example with Node.js for a MySQL Service Broker?
- Already a lot of Service Broker examples in Java and Ruby - some people might be looking for something different. Hope this one can be used as a template for beginners like myself.
- MySQL Community Edition can be easily found and installed on Windows, Mac OS X or Linux and monitored with a good GUI admin tool called MySQL Workbench - easy for local environment test.
- Trust Microservices in Node.js fits this kind of task better.
- I am a database engineer without too much javascript experience and happen to notice that Node.js is so powerful and make applications and services easy to compose.
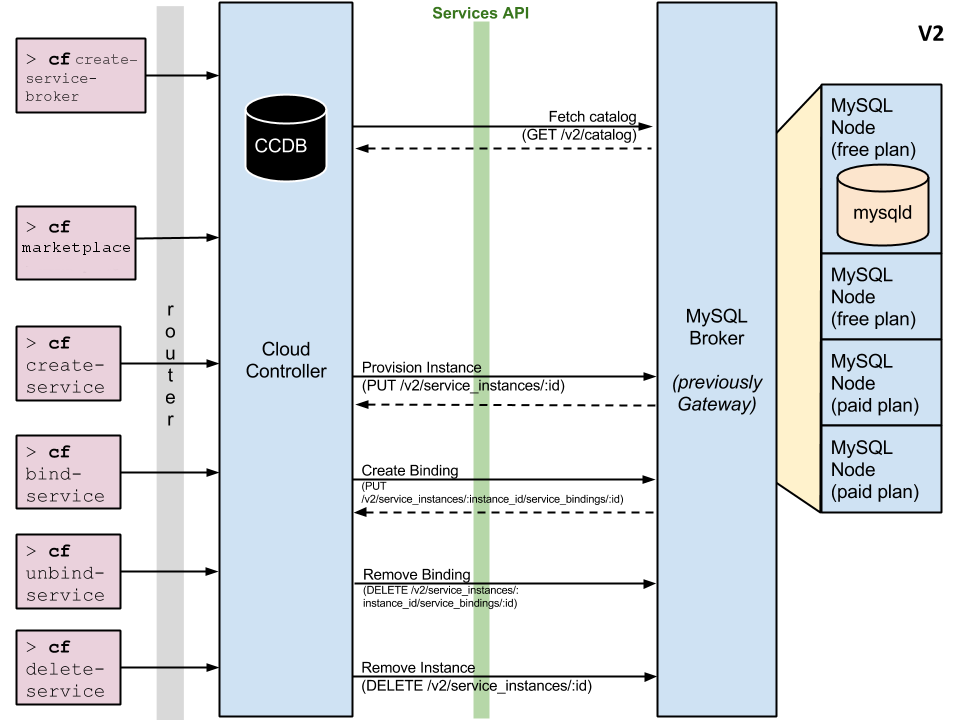
Architecture
Cloud Foundry Service Broker API v2
The broker can be deployed to any place where both sides - Cloud Foundry and MySQL Server - can be reached.

Local Environment Test
Starting with a local MySQL server. Go to http://dev.mysql.com/downloads/mysql/ and download and install the proper release for your OS.
I also prefer to use MySQL Workbench for GUI management but it is optional.
Clone this repository.
git clone https://github.com/komushi/cf-mysql-node-broker
cd cf-mysql-node-broker
Open cf-mysql-node-broker/server/app.js and uncomment the following lines. Hope they match your default settings.
// process.env['host'] = "localhost";
// process.env['port'] = "3306";
// process.env['user'] = "root";
// process.env['password'] = "";
Remeber to install node.js and npm first. Then, install the dependencies:
npm install
Then, run the Application:
npm start
You should be able access your app at with test/test as credentials. I just decided to use the basic authentication to make the code simple.
http://localhost:9000/v2/
Let's test the Microservices now.
curl -i -X GET http://test:test@localhost:9000/v2/catalog
HTTP/1.1 200 OK X-Powered-By: Express access-control-allow-origin: * access-control-allow-methods: GET,PUT,POST,DELETE,OPTIONS access-control-allow-headers: Content-Type, Authorization, Content-Length, X-Requested-With content-type: application/json content-length: 85107 Date: Fri, 20 Feb 2015 09:40:55 GMT Connection: keep-alive
{"services":[{"name":"mac-mysql","id":"3101b971-1044-4816-a7ac-9ded2e028079","description":"MySQL service for application development and testing","bindable":true,"tags":["mysql","relational"],"max_db_per_node":250,"metadata":{"displayName":"MySQL On Mac".....
curl -i -X PUT http://test:test@localhost:9000/v2/service_instances/myinstance
HTTP/1.1 200 OK X-Powered-By: Express access-control-allow-origin: * access-control-allow-methods: GET,PUT,POST,DELETE,OPTIONS access-control-allow-headers: Content-Type, Authorization, Content-Length, X-Requested-With content-type: application/json content-length: 2 Date: Fri, 20 Feb 2015 09:47:14 GMT Connection: keep-alive
{}
Check your MySQL server, now you should have a MySQL schema called myinstance.
curl -i http://test:test@localhost:9000/v2/service_instances/myinstance/service_bindings/mybindingid -d '{
"plan_id": "plan-guid-here",
"service_id": "service-guid-here",
"app_guid": "app-guid-here"
}' -X PUT
HTTP/1.1 200 OK X-Powered-By: Express access-control-allow-origin: * access-control-allow-methods: GET,PUT,POST,DELETE,OPTIONS access-control-allow-headers: Content-Type, Authorization, Content-Length, X-Requested-With content-type: application/json content-length: 210 Date: Fri, 20 Feb 2015 09:49:55 GMT Connection: keep-alive
{"credentials":{"uri":"mysql://0fd7c4b7475c3cbd:d235440f6be97030@localhost:3306/myinstance","username":"0fd7c4b7475c3cbd","password":"d235440f6be97030","host":"localhost","port":"3306","database":"myinstance"}}
Check your MySQL server, now you should have a user which has privileges of the schema myinstance. Remember the user name is generated by the binding id named mybindingid.
curl -i 'http://test:test@localhost:9000/v2/service_instances/myinstance/service_bindings/mybindingid?service_id=service-id-here&plan_id=plan-id-here' -X DELETE
HTTP/1.1 200 OK X-Powered-By: Express access-control-allow-origin: * access-control-allow-methods: GET,PUT,POST,DELETE,OPTIONS access-control-allow-headers: Content-Type, Authorization, Content-Length, X-Requested-With content-type: application/json content-length: 2 Date: Fri, 20 Feb 2015 09:55:49 GMT Connection: keep-alive
{}
Check your MySQL server, the user is gone.
curl -i -X DELETE http://test:test@localhost:9000/v2/service_instances/myinstance
HTTP/1.1 200 OK X-Powered-By: Express access-control-allow-origin: * access-control-allow-methods: GET,PUT,POST,DELETE,OPTIONS access-control-allow-headers: Content-Type, Authorization, Content-Length, X-Requested-With content-type: application/json content-length: 2 Date: Fri, 20 Feb 2015 09:58:57 GMT Connection: keep-alive
{}
This time the schema myinstance is also gone.
Deployment to Cloud Foundry
If you are confident enough about this example you can skip the local test and deploy it to a web server which supports Node.js.
Clone this repository,
git clone https://github.com/komushi/cf-mysql-node-broker
cd cf-mysql-node-broker
Remember to install cf cli first. Then, push the application:
cf push
You can access your app at test/test as credentials.
http://cf-mysql-node-broker.<your-cf-app-domain>/v2
Create Service Broker with admin access.
cf create-service-broker mysqlbroker test test http://cf-mysql-node-broker.<your-cf-app-domain>
Make the service available to all the organizations.
cf enable-service-access mac-mysql
Set MySQL credentials as environment variables to the broker application.
cf set-env cf-mysql-node-broker host yourmysqlhost
cf set-env cf-mysql-node-broker port yourmysqlport
cf set-env cf-mysql-node-broker user 3306
cf set-env cf-mysql-node-broker password rootpassword
Restart the broker application to enable those environment variables.
cf restart cf-mysql-node-broker
You are now able to create MySQL schema and bind users to your applications.